
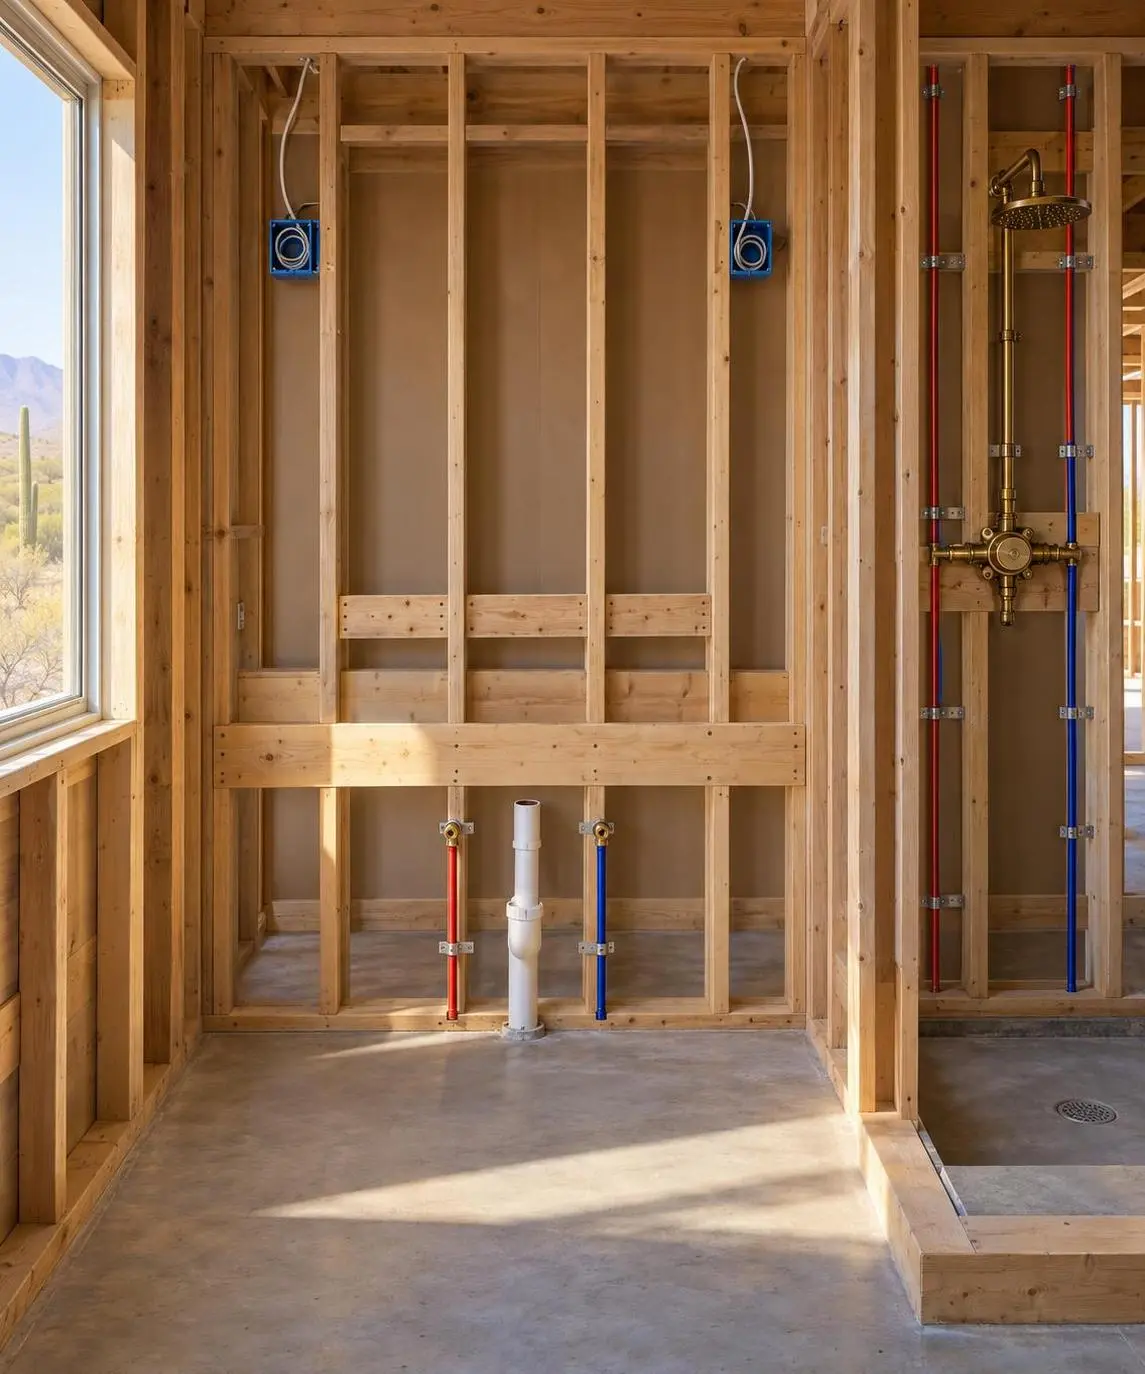

The pre-drywall walkthrough is a planned review, held after plumbing, electrical, and HVAC (heating, ventilation, and air conditioning) are roughed in but before insulation and drywall go up, where the homeowner and project team compare what is inside the open walls against the drawings and finish schedule. Its job is simple: confirm that every box, valve, drain, duct, and piece of blocking sits where the finished design needs it. At this stage, moving an outlet or adding blocking usually means a few minutes of work with open framing. After drywall, the same change means cutting, patching, retexturing, and repainting, and sometimes reinspection. A walkthrough done well is one of the most inexpensive ways to keep a remodel true to its design.
Where Rough-In Falls in the Remodel Sequence
Rough-in is the stage when the trades install the parts of their systems that will eventually be concealed. Framing is complete, and plumbers have run supply lines and drains, electricians have set boxes and pulled wire, and the HVAC contractor has run ducts and set boot locations for supply registers and returns. Nothing is finished yet. There are no fixtures, no devices on the walls, and no grilles over the duct openings, only the hidden routes and termination points that will decide where those finished pieces can go.
The usual order is demolition and framing, then rough-in for each trade, then the required rough inspections, then insulation, then drywall, then finishes. Rough-in is the hinge between planning and finishing. Everything decided during design either lands correctly in the walls now or has to be corrected later at a higher cost. For that reason, the pre-drywall walkthrough deserves its own date on the schedule rather than being squeezed into a passing site visit.
How the Walkthrough Differs From the Required Rough-In Inspection
Homeowners often assume that a passed rough-in inspection means the walls are ready to close. The two reviews answer different questions. In many jurisdictions, the building department's rough inspection follows the model International Residential Code (IRC), a widely adopted set of minimum construction standards for homes. Under the published model code, Section R109.1.2 calls for rough inspection of plumbing, mechanical, gas, and electrical systems before they are covered or concealed and before fixtures or appliances are installed. The inspector is checking for minimum safety and code compliance.
What the inspector is not checking is whether the sconce box is centered on the vanity mirror, whether the shower valve sits at the height on the finish schedule, or whether there is blocking behind the future floating shelf. That is the purpose of the walkthrough: design fidelity, meaning how closely the installed work follows the approved plans. Local codes, amendments, and inspection sequences vary, and some departments combine rough and framing inspections, so confirm the required inspections and their order with your local building department and your contractor. This article offers general information, not code or legal advice.
Timing matters. When possible, schedule the walkthrough just before the rough inspection, so any moved box or added circuit is in place when the inspector arrives. Changes made after an approval may need a follow-up inspection before the walls can close.
The Wall-Close Review: Verify Against the Drawings and Finish Schedule
A useful walkthrough is not a general look around. It is a structured comparison between three references: the construction drawings, the electrical and lighting layout, and the finish schedule, which lists every selected fixture, finish, and appliance. The studio's approach, a Wall-Close Review, works room by room and wall by wall, asking one question at each opening: does what is installed here match what the finished room requires?
The finish schedule carries more weight here than many people expect. A rough-in location is only correct relative to the product that will sit in front of it. A vanity's width sets where its drain and supply lines should land. A wall-mounted faucet requires supply lines at an exact height above the basin. A shower trim kit requires a valve body set to a specific depth for the planned tile and setting bed. If a selection changed after the drawings were issued, the rough-in may faithfully follow an outdated plan. Bring the current finish schedule, and the manufacturer's installation sheets for any fixture with critical rough-in dimensions, to the walkthrough.
Electrical and Lighting: Outlets, Switches, and Fixture Boxes
Walk each room with the electrical layout in hand and picture how the space will be used. Check that outlets are placed relative to the furniture plan, not just evenly spaced along the walls: beside the beds, behind the media wall, at the desk, and wherever a floor box was intended. Check that switches sit on the latch side of each door, where a hand naturally reaches, and that rooms with two entries have switching at both.
Lighting boxes deserve close measurement. Pendants over an island should align with the island's final dimensions and centerline, not the rough framing. Sconces beside or above a mirror should be centered on the mirror and set at the specified height. Recessed lights should clear ceiling joists, ducts, and the cabinet run below them. In kitchens, verify the dedicated circuits and their positions for the range, refrigerator, dishwasher, microwave, and any appliance garage outlets. An outlet that lands behind a cabinet side panel or a hood liner is a common and avoidable miss.
Plumbing: Valve Heights, Drain Positions, and Supply Lines
Plumbing errors are some of the most disruptive to discover after drywall, because correcting them often means opening tile walls, not just painted drywall. At every wet wall, confirm that the drain centerline matches the fixture it will serve. A toilet flange should sit at the correct distance from the finished wall for the selected toilet. A vanity drain should be centered on the sink, or on each sink for a double vanity, at the height the cabinet allows.
In showers, check the mixing valve height, the showerhead or rain-head arm position, the location of any handheld wall bar or diverter, and the niche location relative to the valve. Confirm valve depth against the planned wall build-up so the trim will fit cleanly. Also confirm supply lines for the refrigerator water line, pot filler, and any laundry box. Ask whether the plumbing is still under pressure test or has been tested, so you know the system's status before it is concealed.
Blocking for Cabinets, Grab Bars, Televisions, and Heavy Fixtures
Blocking is solid lumber installed between studs to give fasteners something strong to grab once the wall is finished. It costs very little to add while the framing is open and can be a significant demolition project to add later. Before the walls close, identify every wall-hung item in the design and confirm blocking at the right height and width for each one.
Typical locations include upper cabinets and floating vanities, open shelving, towel bars and robe hooks, shower glass hinges and support bars, mirrors, wall-mounted televisions, art lighting, heavy light fixtures, handrails, and future grab bars near toilets and in showers. Grab bar blocking is worth adding even if bars are not planned yet, because it allows aging-in-place support to be added later without opening the wall. Photograph each blocked area with a tape measure visible so the location can be found after drywall.
Low-Voltage Wiring, Speakers, and HVAC Vents and Returns
Low-voltage wiring covers the lighter-duty cabling for networks, security, doorbells, shades, audio, and television connections. It is often run by a separate installer on a separate plan, so it is easy to miss in a walkthrough focused on standard electrical work. Confirm network drops at the desk and media locations, speaker wire at each planned speaker position, conduit from the media wall to equipment storage, and pre-wire for motorized shades or a future camera.
For HVAC, compare supply register and return locations to the reflected ceiling plan and furniture layout. A supply vent in a ceiling should not land where a pendant, beam, or recessed light was planned. A floor register should not land under a built-in, island, or bed. Returns should not be blocked by cabinets or doors. Also confirm the routes for bath exhaust fans and the kitchen hood duct, since a poorly located duct can change a ceiling detail or a cabinet design.
Who Should Attend and How to Document and Resolve Discrepancies
The most useful walkthrough brings together the people who can explain the work and the people who can approve changes: the homeowner, the general contractor or site lead, the designer, and when possible the electrician and plumber. If a trade cannot attend, ask the site lead to walk their work in advance so questions can be answered on the spot.
Document as you go. Mark items directly on the framing with tape or marker, photograph every wall in each room before insulation, and keep a running list that notes the room, the item, the issue, and the agreed fix. Before anyone leaves, confirm who will make each correction and when it will be checked again. Anything that changes the scope, cost, or schedule should be captured in a written change order before work proceeds, even if the cost is minor. The goal is a documented, signed-off set of corrections and a photo record of the walls that will be useful for years.
Why Changes Cost Far Less Before Insulation and Drywall
Every remodel decision has a point at which it becomes harder to change. For anything inside a wall, that point is insulation and drywall. Before that, moving a box, adding blocking, or shifting a drain is usually a short, contained task for the trade already on site. After it, the same change involves several trades in sequence: opening the wall, making the correction, possibly scheduling a reinspection, then patching, finishing, and repainting, or removing and replacing tile. A minor change can easily become a multi-day disruption.
The pre-drywall walkthrough is also where the earlier planning work pays off. A clear electrical layout and a current finish schedule make the review faster and more precise, and a disciplined change order process keeps any adjustments organized and accounted for. When those pieces are in place before the walls close, the finished remodel reflects the design rather than the assumptions made during installation.
Disclaimer: The content provided in this article is for informational purposes only and is not intended as financial, tax, or investment advice. JL Coates is not a financial advisor, tax consultant, or investment specialist. We recommend consulting with a professional financial advisor, tax specialist, or investment advisor to discuss your specific circumstances before making any financial, tax, or investment decisions based on this information. JL Coates assumes no responsibility for any actions taken based on the information provided in this article.